Pages

Σάββατο 4 Δεκεμβρίου 2010

Video Παρουσίασης του FreeBSD Project στο Athens Digital Week 2010

Έπειτα από αρκετό καιρό, είναι η αλήθεια, κατάφερα και βρήκα λίγο χρόνο για να δω πως θα ανεβάσω το video της παρουσίασης στο YouTube. Το video είναι μεγαλύτερο σε μέγεθος απ' ότι επιτρέπει το YouTube γι' αυτό και αναγκάστηκα να το περάσω σε δύο κομμάτια...

Παρουσίαση του FreeBSD Project στο Athens Digital Week 2010 - Μέρος 1ο


Παρουσίαση του FreeBSD Project στο Athens Digital Week 2010 - Μέρος 2ο


Ελπίζω να σας αρέσει, αν και το χρονικό όριο της παρουσίασης ήταν πολύ μικρό, μικρότερο απ' ότι υπολογίζαμε από την αρχή.

Όσο για φωτογραφίες μπορείτε να δείτε στο flickr set μου.

Ηλίας Χρυσοχέρης

Πέμπτη 2 Δεκεμβρίου 2010

Αναβάθμιση σκληρού δίσκου σε laptop με openSUSE

Μιας και τον τελευταίο καιρό οι αλλαγές σκληρού δίσκου στα μηχανήματά μου δίνουν και παίρνουν (:Ρ) είπα να κάνω και μια αλλαγή στο laptop. Βασικά τα partitions του σκληρού μου είχαν αρχίσει να γεμίζουν επικίνδυνα και έτσι χρειαζόμουν ένα μεγαλύτερο σκληρό δίσκο σε χωρητικότητα. Ο αρχικός δίσκος ήταν 320G. Οι κατατμήσεις που περιέχει είναι τέσσερις: Μια που περιέχει το backup των άθλιων Bugindow sVista (ναι καλά διαβάσατε... Το ξαναγράφω για σιγουριά: Bugindow sVista! Δεν υπάρχει λάθος ούτε στο spelling, ούτε στα κενά!) από την εταιρία του laptop, ένα που περιέχει το πλήρες άθλιο λειτουργικό που ανέφερα, αλλά απαραίτητο όταν θέλεις να εκτυπώσεις CD σε Canon εκτυπωτή (:(), και άλλα δύο για το αγαπημένο μου openSUSE που το έχω αφήσει ακόμα στην έκδοση 11.2 (Λειτουργικό + Swap).

Τόσο το partition των Bugindows όσο και αυτό του Linux έχουν σχεδόν γεμίσει, των Bugindows γιατί είναι μικρό (LOL) και του Linux από ένα σωρό προγράμματα και Virtual Machines που χρησιμοποιώ. Όχι, τα downloaded files δεν βρίσκονται σε αυτό το σκληρό δίσκο, αλλά σε ένα δεύτερο που διαθέτει το laptop (Ναί, έχει δύο σκληρούς δίσκους αυτό το μικρούλι 17ιντσο!).

"Καλά!", θα έλεγε κάποιος. "Και πού είναι η δυσκολία στο να αντικαταστήσεις τον σκληρό σου δίσκο;". Όχι, δυσκολία δεν υπάρχει, απλά αν περιγράψω κάποια κακώς κείμενα, κάποιος που το κάνει για πρώτη φορά ίσως αποφύγει τα μικροπροβλήματα που δημιουργούνται. Κατά τ' άλλα όλα είναι λογικά και εύκολα. Ο σκοπός μας είναι να αντιγράψουμε τα πάντα από τον ένα σκληρό δίσκο στον άλλο χωρίς ιδιαίτερο κόπο. Όταν τελικά αντικαταστήσουμε τον εσωτερικό σκληρό με τον καινούργιο θα θέλαμε το μηχάνημά μας να κάνει boot όπως ακριβώς ήταν και πριν.

Τι θα χρειαστούμε αρχικά;

Η λίστα των απαραίτητων είναι μικρή:
  • Ένα USB κουτάκι με το οποίο θα συνδέσουμε τον καινούριο σκληρό δίσκο στο μηχάνημά μας
  • Ένα Live CD με το CloneZilla
  • Ένα κατσαβιδάκι για την αλλαγή του σκληρού δίσκου
  • Αρκετή υπομονή και ώρα!

Προετοιμασία για αντιγραφή των partitions

Πρώτα κατεβάζουμε το CloneZilla και το καίμε σε ένα CD. Εναλλακτικά μπορούμε να κατεβάσουμε την έκδοση για USB Flash Stick και να το έχουμε σε ένα Flashάκι. Με αυτό θα κάνουμε αργότερα boot για να αντιγράψουμε τα partitions του αρχικού σκληρού δίσκου στον καινούργιο. Η συνέχεια είναι λίγο kinky! Θα πρέπει να πω κάποια λίγα πράγματα για τον GRUB. Λίγα και βασικά! Μην περιμένετε να τον αναλύσω εξ ολοκλήρου!

Κατ' αρχήν, το Linux για να δει τους σκληρούς δίσκους χρησιμοποιεί τα κλασικά device files, /dev/sda, /dev/sdb κ.λ.π. Υπάρχει, όμως, και ένας εναλλακτικός τρόπος για την πρόσβαση στους σκληρούς δίσκους. Αν μπούμε μέσα στον κατάλογο /dev/disk, θα δούμε ότι υπάρχουν κάποιοι υποκατάλογοι ακόμα. Σε ένα σύστημα openSUSE θα βρείτε τους by-id, by-label, by-path και by-uuid. Σε κάθε ένα από αυτούς τους υποκαταλόγους βλέπουμε ένα σωρό links που δείχνουν προς τα κλασικά αρχεία των συσκευών /dev/sda κ.λ.π. Ο λόγος είναι πως η ανάθεση των device files γίνεται κατά την εκκίνηση και όταν αλλάξουμε κάποιο σκληρό δίσκο, ή ακόμα και αν κάνουμε αναβάθμιση στο BIOS του υπολογιστή, αυτά τα ονόματα δεν θα δείχνουν απαραίτητα στον ίδιο σκληρό δίσκο που εμείς θα θέλαμε, με αποτέλεσμα να έχουμε διάφορες εκπλήξεις! Γι' αυτό το λόγο έχουν δημιουργηθεί και οι υποκατάλογοι μέσα στο /dev/disk.

eliaschr@orion:~> cd /dev/disk
eliaschr@orion:/dev/disk> ls -Rl
.:                              
total 0                         
drwxr-xr-x 2 root root 380 2010-11-18 11:58 by-id
drwxr-xr-x 2 root root 100 2010-11-18 13:58 by-label
drwxr-xr-x 2 root root 220 2010-11-18 11:58 by-path
drwxr-xr-x 2 root root 140 2010-11-18 13:58 by-uuid

./by-id:
total 0 
lrwxrwxrwx 1 root root  9 2010-11-18 13:58 ata-ST9500420AS_5VJ7ND82 -> ../../sda
lrwxrwxrwx 1 root root 10 2010-11-18 13:58 ata-ST9500420AS_5VJ7ND82-part1 -> ../../sda1
lrwxrwxrwx 1 root root 10 2010-11-18 13:58 ata-ST9500420AS_5VJ7ND82-part2 -> ../../sda2
lrwxrwxrwx 1 root root 10 2010-11-18 13:58 ata-ST9500420AS_5VJ7ND82-part3 -> ../../sda3
lrwxrwxrwx 1 root root 10 2010-11-18 13:58 ata-ST9500420AS_5VJ7ND82-part4 -> ../../sda4
lrwxrwxrwx 1 root root  9 2010-11-18 13:58 ata-WDC_WD5000BEVT-00A0RT0_WD-WX10AA9D0409 -> ../../sdb
lrwxrwxrwx 1 root root 10 2010-11-18 13:58 ata-WDC_WD5000BEVT-00A0RT0_WD-WX10AA9D0409-part1 -> ../../sdb1
lrwxrwxrwx 1 root root  9 2010-11-18 11:58 edd-int13_dev80 -> ../../sda                                  
lrwxrwxrwx 1 root root  9 2010-11-18 11:58 edd-int13_dev81 -> ../../sdb                                  
lrwxrwxrwx 1 root root  9 2010-11-18 13:58 scsi-SATA_ST9500420AS_5VJ7ND82 -> ../../sda                   
lrwxrwxrwx 1 root root 10 2010-11-18 13:58 scsi-SATA_ST9500420AS_5VJ7ND82-part1 -> ../../sda1            
lrwxrwxrwx 1 root root 10 2010-11-18 13:58 scsi-SATA_ST9500420AS_5VJ7ND82-part2 -> ../../sda2            
lrwxrwxrwx 1 root root 10 2010-11-18 13:58 scsi-SATA_ST9500420AS_5VJ7ND82-part3 -> ../../sda3            
lrwxrwxrwx 1 root root 10 2010-11-18 13:58 scsi-SATA_ST9500420AS_5VJ7ND82-part4 -> ../../sda4            
lrwxrwxrwx 1 root root  9 2010-11-18 13:58 scsi-SATA_WDC_WD5000BEVT-_WD-WX10AA9D0409 -> ../../sdb        
lrwxrwxrwx 1 root root 10 2010-11-18 13:58 scsi-SATA_WDC_WD5000BEVT-_WD-WX10AA9D0409-part1 -> ../../sdb1 
lrwxrwxrwx 1 root root  9 2010-11-18 13:58 usb-Generic-_Multi-Card_20060413092100000-0:0 -> ../../sdc

./by-label:
total 0
lrwxrwxrwx 1 root root 10 2010-11-18 13:58 Common -> ../../sdb1
lrwxrwxrwx 1 root root 10 2010-11-18 13:58 HDD -> ../../sda2
lrwxrwxrwx 1 root root 10 2010-11-18 13:58 _OEMBP -> ../../sda1

./by-path:
total 0
lrwxrwxrwx 1 root root  9 2010-11-18 13:58 pci-0000:00:02.1-usb-0:2:1.0-scsi-0:0:0:0 -> ../../sdc
lrwxrwxrwx 1 root root  9 2010-11-18 11:58 pci-0000:00:06.0-scsi-0:0:0:0 -> ../../sr0
lrwxrwxrwx 1 root root  9 2010-11-18 13:58 pci-0000:00:09.0-scsi-0:0:0:0 -> ../../sda
lrwxrwxrwx 1 root root 10 2010-11-18 13:58 pci-0000:00:09.0-scsi-0:0:0:0-part1 -> ../../sda1
lrwxrwxrwx 1 root root 10 2010-11-18 13:58 pci-0000:00:09.0-scsi-0:0:0:0-part2 -> ../../sda2
lrwxrwxrwx 1 root root 10 2010-11-18 13:58 pci-0000:00:09.0-scsi-0:0:0:0-part3 -> ../../sda3
lrwxrwxrwx 1 root root 10 2010-11-18 13:58 pci-0000:00:09.0-scsi-0:0:0:0-part4 -> ../../sda4
lrwxrwxrwx 1 root root  9 2010-11-18 13:58 pci-0000:00:09.0-scsi-1:0:0:0 -> ../../sdb
lrwxrwxrwx 1 root root 10 2010-11-18 13:58 pci-0000:00:09.0-scsi-1:0:0:0-part1 -> ../../sdb1

./by-uuid:
total 0
lrwxrwxrwx 1 root root 10 2010-11-18 13:58 0C90BD9C90BD8D28 -> ../../sda2
lrwxrwxrwx 1 root root 10 2010-11-18 13:58 14A4F162A4F14730 -> ../../sdb1
lrwxrwxrwx 1 root root 10 2010-11-18 13:58 269cc848-3599-4559-9c2b-5494643d6b64 -> ../../sda3
lrwxrwxrwx 1 root root 10 2010-11-18 13:58 90CEA1A2CEA180D8 -> ../../sda1
lrwxrwxrwx 1 root root 10 2010-11-18 13:58 970013ea-d703-4b36-8d77-44d9aca0ea65 -> ../../sda4
eliaschr@orion:/dev/disk>

Αυτά όλα τα links οδηγούν στα κλασικά device files. Αλλά αυτά παράγονται από διάφορα χαρακτηριστικά που έχει ο κάθε συνδεδεμένος σκληρός επάνω στο σύστημά μας (όπως π.χ. όνομα μοντέλου, σειριακός αριθμός κ.λ.π.). Αυτά τα χαρακτηριστικά δεν άλλάζουν ανάλογα με τη σύνδεση, γιατί είναι χαρακτηριστικά του ίδιου του σκληρού δίσκου που υπάρχει στο σύστημα. Γιατί τόσος λόγος για αυτά τα αρχεία; Γιατί ο GRUB ρυθμίζεται με βάση αυτά στο openSUSE και όταν θα αλλάξουμε σκληρό δίσκο στο μηχάνημά μας θα υπάρχει πρόβλημα στην εκκίνηση.

Το αρχείο το οποίο καθορίζει τις ρυθμίσεις του GRUB είναι το /boot/grub/grub.conf, ενώ από αυτό φτιάχνονται και κάποια άλλα αρχεία όπως το /boot/grub/menu.lst. Σε αυτά τα δύο αρχεία θα επέμβουμε πριν ξεκινήσουμε την αντιγραφή του σκληρού δίσκου στον καινούργιο.

Πιο συγκεκριμένα, το αρχείο /boot/grub/grub.conf περιέχει τα παρακάτω:
eliaschr@orion:~> su                       
Password:                                  
orion:/home/eliaschr # cat /boot/grub/grub.conf  
# Modified by YaST2. Last modification on Tue Mar 23 13:58:50 EET 2010
# THIS FILE WILL BE PARTIALLY OVERWRITTEN by perl-Bootloader
# Configure custom boot parameters for updated kernels in /etc/sysconfig/bootloader

default 0
timeout 8
##YaST - generic_mbr
gfxmenu (hd0,2)/boot/message
##YaST - activate

###Don't change this comment - YaST2 identifier: Original name: linux###
title Desktop -- openSUSE 11.2 - 2.6.31.12-0.2
    root (hd0,2)
    kernel /boot/vmlinuz-2.6.31.12-0.2-desktop root=/dev/disk/by-id/ata-ST9500420AS_5VJ7ND82-part3 resume=/dev/disk/by-id/ata-ST9500420A_5VJ7ND82-part4 quiet showopts vga=0x365
    initrd /boot/initrd-2.6.31.12-0.2-desktop

###Don't change this comment - YaST2 identifier: Original name: failsafe###
title Failsafe -- openSUSE 11.2 - 2.6.31.12-0.2
    root (hd0,2)
    kernel /boot/vmlinuz-2.6.31.12-0.2-desktop root=/dev/disk/by-id/ata-ST9500420AS_5VJ7ND82-part3 showopts apm=off noresume edd=off powersaved=off nohz=off highres=off processor.max_cstate=1 x11failsafe vga=0x314
    initrd /boot/initrd-2.6.31.12-0.2-desktop

###Don't change this comment - YaST2 identifier: Original name: windows 1###
title Bugindow sVista
    rootnoverify (hd0,1)
    chainloader +1
orion:/home/eliaschr #

Παρατηρούμε ότι στις παραμέτρους root και resume χρησιμοποιούνται ονομασίες κατατμήσεων από τον υποκατάλογο /dev/disk/by-id. Παρατηρούμε, επίσης, τις πρώτες γραμμές να μας προειδοποιούν ότι αυτό το αρχείο αλλάζει από κάποιο script αυτόματα, που σημαίνει ότι αν κάνουμε αλλαγές σε αυτό, κάποια στιγμή οι αλλαγές θα χαθούν. Βέβαια, τα πράγματα δεν είναι τόσο τραγικά, αλλά για να χρησιμοποιήσουμε τις ευκολίες του γραφικού περιβάλλοντος του openSUSE θα το τροποποιήσουμε από το εργαλείο Yast2.

Αρχικά, από το μενού του γραφικού περιβάλλοντος KDE4 στην καρτέλα "Υπολογιστής" ("Computer") κάνουμε κλικ στην πρώτη επιλογή, "YaST".

Από το παράθυρο που ανοίγει επιλέγουμε από την αριστερή στήλη το "Σύστημα" ("System") και από τις επιλογές της δεξιάς στήλης επιλέγουμε το "Bootloader". Τότε θα ανοίξει το ακόλουθο παράθυρο:

Εκεί, μπορούμε να παρατηρήσουμε τις επιλογές που μας εμφανίζει ο GRUB κατά την εκκίνηση του υπολογιστή μας. Σε αυτές είναι που θα επέμβουμε, λιγάκι. Για να κάνουμε την επέμβαση, απλά επιλέγουμε την επιλογή που μας ενδιαφέρει και πατάμε το "Edit". Τότε εμφανίζεται και το ακόλουθο παράθυρο. Εκεί, φυσικά, οι δικές σας ρυθμίσεις θα είναι διαφορετικές από αυτές που φαίνονται στην εικόνα.

Οι ρυθμίσεις που μας ενδιαφέρουν είναι οι root και η resume. Η πρώτη βρίσκεται στο "Root Device", ενώ η δεύτερη βρίσκεται στο "Optional Kernel Command Line Parameter". Αυτά τα ρυθμίζουμε να περιέχουν τα standard device names ανάλογα με το partition που δείχνουν. Στη δικιά μου περίπτωση είναι αυτά που φαίνονται στην ακόλουθη εικόνα (/dev/sda3 και /dev/sda4 αντίστοιχα):

Εκεί πατάμε το "OK" και επιστρέφουμε στην προηγούμενη εικόνα. Επαναλαμβάνουμε τα ίδια για κάθε επιλογή του GRUB, και βάζουμε στις ρυθμίσεις τις αντίστοιχες, πάντα, κατατμήσεις σε standard device names. Προσέχουμε να δείχνουν τις σωστές κατατμήσεις κάθε φορά. Στο τέλος πατάμε και σε αυτή την εικόνα το "OK". Ο υπολογιστής κάνει την καινούργια εγκατάσταση του GRUB.

Κάτι που ΔΕΝ ΠΡΕΠΕΙ ΝΑ ΞΕΧΑΣΟΥΜΕ είναι να κάνουμε τις αντίστοιχες διορθώσεις και στο αρχείο /etc/fstab. Για να γίνουν οι αλλαγές πρέπει να είμαστε logged in σαν root χρησιμοποιώντας τον αγαπημένο μας editor, όπως π.χ. τον vi. Ένα τυπικό αρχείο με τις αλλαγές του είναι το:

orion:/home/eliaschr # cat /etc/fstab
/dev/sda4  swap               swap     defaults              0 0
/dev/sda3  /                  ext3     acl,user_xattr        1 1
/dev/sda2  /windows/C         ntfs-3g  users,gid=users,fmask=113,dmask=002,locale=el_GR.UTF-8 0 0
/dev/sdb1  /windows/D         ntfs-3g  users,gid=users,fmask=113,dmask=002,locale=el_GR.UTF-8 0 0
proc       /proc              proc     defaults              0 0
sysfs      /sys               sysfs    noauto                0 0
debugfs    /sys/kernel/debug  debugfs  noauto                0 0
usbfs      /proc/bus/usb      usbfs    noauto                0 0
devpts     /dev/pts           devpts   mode=0620,gid=5       0 0
orion:/home/eliaschr #

Αντιγραφή των κατατμήσεων στον καινούργιο σκληρό δίσκο

Ήρθε η ώρα να κάνουμε boot το CloneZilla. Εδώ οι εικόνες που εμφανίζονται είναι, φυσικά, από εικονικό μηχάνημα γιατί αλλιώς δε θα μπορούσαμε να τις τραβήξουμε από το σύστημα την ώρα που τρέχει. Το εικονικό μηχάνημα θα μας βοηθήσει να καταλάβουμε τι κάνουμε, με τη διαφορά μόνο στις ονομασίες των σκληρών δίσκων.

Αφού βάλουμε το CD του CloneZilla στον οδηγό του υπολογιστή μας, ελέγχουμε ότι το BIOS μας θα προσπαθήσει να κάνει boot πρώτα από εκεί και όχι από τον σκληρό δίσκο. Αν όλα είναι εντάξει τότε η εκκίνηση του υπολογιστή θα δείξει την ακόλουθη εικόνα:

Εδώ ξεκινάμε το CloneZilla, όπως φαίνεται και στην εικόνα. Αφού επιλέξουμε στις ακόλουθες εικόνες τη γλώσσα και το keymap του πληκτρολογίου μας (αφήνουμε τα προεπιλεγμένα) καταλλήγουμε στην εικόνα:

Η επιλογή μας δε θα μπορούσε να είναι άλλη από την εκκίνηση του προγράμματος, όπως φαίνεται και η ενεργοποιημένη επιλογή. Η επόμενη ερώτηση που μας κάνει ο υπολογιστής είναι αν η αντιγραφή θα αφορά image από partition ή αν θα γίνει σε κανονικά devices απ' ευθείας. Εφόσον πάμε να αντιγράψουμε έναν ολόκληρο σκληρό δίσκο σε έναν άλλο, δε θα κάνουμε καθόλου με images των partitions. Οπότε η σωστή επιλογή είναι αυτή που φαίνεται στο στιγμιότυπο:

Και για όλους εμάς που είμαστε καινούργιοι στο άθλημα του CloneZilla καλό είναι να επιλέξουμε το Beginner mode...

Τη συνέχεια, λίγο πολύ, τη φανταζόμαστε. Επιλέγουμε αν η κλωνοποίηση θα γίνει τοπικά ή απομακρυσμένα. Φυσικά επειδή και οι δύο συσκευές σκληρών δίσκων είναι επάνω στο ίδιο μηχάνημα η κλωνοποίηση είναι τοπική. Εδώ καλό είναι να συνδέσουμε τον εξωτερικό σκληρό δίσκο στη USB θύρα πριν προχωρήσουμε. Ο παλιός σκληρός δίσκος, δηλαδή, είναι ο εσωτερικός του μηχανήματος, ενώ ο δίσκος που θα δεχθεί τα δεδομένα είναι ο εξωτερικός που συνδέουμε στη θύρα USB.

Σε αυτό το σημείο θα επιλέξουμε τον σκληρό δίσκο από τον οποίο θα πάρουμε τα δεδομένα (Source). Είναι ο δίσκος που περιέχει τα λειτουργικά συστήματά μας και είναι συνδεδεμένος εσωτερικά στο μηχάνημα. Αυτό σημαίνει ότι θα τον βλέπουμε με το όνομα sda.

Όταν συνδέσαμε τον εξωτερικό σκληρό δίσκο στη θύρα USB είδαμε κάποια μηνύματα που μας έδειχναν την ονομασία του εξωτερικού σκληρού δίσκου. Σε αυτό το παράδειγμα ο εξωτερικός δίσκος είναι ο sdb. Αυτόν θα επιλέξουμε και σαν συσκευή που θα δεχθεί τα δεδομένα μας (Destination).

Αφού πατήσουμε το OK, είμαστε στο τελευταίο σημείο πριν ξεκινήσει η κλωνοποίηση. Καλό είναι να κάνουμε έναν έλεγχο για το αν έχουμε κάνει τη σωστή επιλογή στους σκληρούς δίσκους, γιατί ένα λάθος θα μπορούσε να είναι μοιραίο για τα δεδομένα μας! Προσοχή!

Η τελική μας επιλογή, αν όλα είναι σωστά, είναι να γράψουμε y και η κλωνοποίηση ξεκινάει. Τώρα έχετε πάρα πολύ χρόνο να ασχοληθείτε με οτιδήποτε άλλο εκτός από τον υπολογιστή σας... :D

Τελικές Κινήσεις

Όταν τελειώσει η κλωνοποίηση μπορούμε να κάνουμε shutdown στον υπολογιστή μας. Τώρα ήρθε η ώρα να πιάσουμε κατσαβίδι στα χέρια μας και να ανταλλάξουμε θέσεις στους σκληρούς δίσκους. Δεν είναι καμιά ιδιαίτερα δύσκολη διαδικασία, όσο είμαστε προσεκτικοί σε αυτό που κάνουμε, όλα θα πάνε καλά.

Μόλις γίνει η αλλαγή των σκληρών δίσκων, μπορούμε να ανάψουμε τον υπολογιστή μας ξανά. Αν όλα τα κάναμε σωστά τότε το openSUSE θα εκκινήσει κανονικά!. Το μόνο που θα παρατηρήσουμε είναι ότι η αρχική εικόνα του GRUB δεν έχει το γραφικό τμήμα, αλλά είναι όλη σε text mode. Πώς μπορούμε να το φτιάξουμε αυτό; Με μια κίνηση επανεγκατάστασης δύο πακέτων. Ας δούμε τη διαδικασία:

Αρχικά τρέχουμε το YaST όπως ακριβώς κάναμε και στην αρχή του άρθρου. Εκεί θα επιλέξουμε τη "Διαχείριση Λογισμικού" ("Software Management").

Εδώ θα ψάξουμε τα διαθέσιμα πακέτα με τη λέξη grub οπότε θα μας εμφανίσει ο υπολογιστής μας 3 πακέτα. Τα δύο είναι ήδη εγκαταστημένα.

Κάνοντας δεξί κλικ σε μια επιλογή, στο μενού που εμφανίζεται πάμε τον κέρσορα του ποντικιού μας στην επιλογή "Όλα σε αυτή τη λίστα..." ("All in this list...") και εμφανίζεται ακόμα ένα υπομενού. Η επιλογή που μας ενδιαφέρει είναι η "Ενημέρωση χωρίς συνθήκες" ("Update unconditionally"). Όταν κάνουμε την επιλογή τα δύο εικονίδια δίπλα από τα πακέτα που είναι ήδη εγκαταστημένα στον υπολογιστή αλλάζουν και μας δείχνουν ότι πρόκειται να ενημερωθούν. Πατώντας το πλήκτρο "Αποδοχή" ("Accept") που βρίσκεται κάτω και δεξιά, γίνεται η εγκατάσταση των δύο πακέτων. Μετά από αυτό, στην επόμενη επανεκκίνηση του υπολογιστή μας θα δούμε και το κλασικό γραφικό περιβάλλον του GRUB, όπως το είχαμε συνηθίσει!

Αν κάτι δεν πάει καλά στην εκκίνηση του καινούργιου σκληρού

Κάτι που θα πρέπει να πω είναι ότι το openSUSE μας δίνει τη δυνατότητα να κάνουμε επιδιόρθωση του λειτουργικού μας συστήματος από το DVD εκκίνησης. Αν λοιπόν, όταν εκκινήσουμε τον υπολογιστή μας με τον καινούργιο σκληρό δίσκο, δε μπορέσουμε να δούμε την εικόνα του GRUB, τότε μάλλον κάτι έχουμε κάνει λάθος παραπάνω. Μπορούμε πάντα να επιδιορθώσουμε τον bootloader με τη βοήθεια του DVD εγκατάστασης. Αν κάνουμε από αυτό εκκίνηση του υπολογιστή τότε θα δούμε την ακόλουθη εικόνα:

Η επιλογή "Resque System" μας βγάζει σε κονσόλα όπου έχουμε δικαιώματα υπερχρήστη. Έτσι μπορούμε να κάνουμε ότι θέλουμε στο σύστημά μας. Ενδείκνυται για τους σκληροπυρηνικούς τύπους, που μπορούν να κάνουν τα πάντα από την κονσόλα σε ένα σύστημα. Αν όμως δεν είστε από αυτούς, τότε μπορείτε να επέμβετε στο σύστημα λίγο πιο απλά με το εργαλείο "Repair Installed System", όπως φαίνεται και στην εικόνα.

Για την πρώτη περίπτωση δεν έχουμε να πούμε και πολλά... Σε αυτό το how-to θα ασχοληθούμε με το εργαλείο που φαίνεται να επιλέγουμε και στο στιγμιότυπο παραπάνω. Μετά την επιλογή του θα δούμε την ακόλουθη εικόνα:

Εδώ η επιλογή "Expert Tools" είναι αυτή που μας χρειάζεται. Αυτή θα μας εμφανίσει αρκετά εργαλεία που θα μπορέσουμε να χρησιμοποιήσουμε για να κάνουμε επιδιόρθωση στο σύστημά μας.

Και η πρώτη επιλογή είναι αυτή που μας χρειάζεται! "Install New Boot Loader". Όταν την επιλέξουμε θα δούμε ένα αρκετά γνώριμο περιβάλλον. Είναι το YaST και συγκεκριμένα το κομμάτι του με το οποίο ρυθμίζουμε, τι άλλο, τον GRUB.

Κάτω και δεξιά υπάρχει ένα πλήκτρο που ονομάζεται "Other". Όταν το επιλέξουμε εμφανίζεται ένα μενού που έχει κάποιες επιλογές. Αυτή που μας ενδιαφέρει σε πρώτη φάση είναι η επιλογή "Reread Configuration from Disk". Όταν κάνουμε κλικ επάνω της, θα δούμε να εμφανίζονται οι επιλογές που έχει κανονικά ο GRUB.

Επιστρέφουμε πάλι στο μενού "Other" για να επιλέξουμε την τελευταία επιλογή του, "Write Bootloader Boot Code to Disk".

Τέλος επιλέγουμε την καρτέλα "Boot Loader Installation" και εκεί κάνουμε τις ρυθμίσεις που φαίνονται στο ακόλουθο στιγμιότυπο:

Αφού γίνουν όλα αυτά, πατάμε το "OK" και αφήνουμε τον υπολογιστή να εγκαταστήσει τον GRUB και πάλι. Έτσι, διορθώνουμε και το πρόβλημα του boot.

Εδώ, άλλο ένα how-to τελειώνει. Ελπίζω να βοήθησα όποιον ενδιαφέρεται να "μεγαλώσει" λίγο τον σκληρό του δίσκο στο laptop. Αν έχετε openSUSE 11.3, η διαφορά είναι πως εκεί υπάρχει μόνο η επιλογή "Resque System" και έτσι θα έχετε να κάνετε με περιβάλλον κονσόλας, το οποίο βέβαια δεν είναι απαραίτητα κακό! Απλά, μια λίγο καλύτερη γνώση στην εκκίνηση και στα συστήματα αρχείων είναι καλό να υπάρχει, καθώς επίσης να γνωρίζεται εντολές του τύπου fdisk κ.λ.π.

May the source be with you

Ηλίας Χρυσοχέρης

Πέμπτη 25 Νοεμβρίου 2010

Το openSUSE Weekly News τεύχος 150 μεταφρασμένο

Κάποιοι από εσάς μπορεί να ξέρετε ότι πριν από λίγο καιρό (βασικά αρκετό, αλλά εγώ το πήρα χαμπάρι πριν λίγο καιρό :D) συστάθηκε η ελληνική κοινότητα openSUSE. Παρότι τον τελευταίο καιρό είμαι λιγάκι πηγμένος (πρωτότυπο...) από τα projects που τρέχουν και δε μπορώ να συνεισφέρω τόσο όσο θα ήθελα σε αυτή την κοινότητα, είμαι κι εγώ μέλος της. Δε θα μπορούσε να είναι διαφορετικά, μιας και όσοι με γνωρίζουν προσωπικά ξέρουν ότι για μένα το openSUSE είναι η αγαπημένη μου διανομή Linux.

Τα παιδιά της ομάδας έχουν ήδη ξεκινήσει με πολύ ζήλο τις μεταφράσεις. Είναι αλήθεια πως τα τελευταία χρόνια η μετάφραση στα Ελληνικά ήταν λίγο ελλειπής. Το πρώτο ολοκληρωμένο αποτέλεσμα από την ομάδα είναι η μετάφραση του openSUSE Weekly News, τεύχους 150. Η ομάδα έχει κάνει καταπληκτική δουλειά και αυτό δείχνει τη μεγάλη όρεξη που έχουν να συνεισφέρουν σε αυτό που τους αρέσει, όπως άλλωστε είναι και το πνεύμα του ανοικτού λογισμικού.

Δευτέρα 22 Νοεμβρίου 2010

2o HackFest - HackFest 21-11-2010

Την Κυριακή 21/11/2010 έλαβε μέρος το δεύτερο οργανωμένο HackFest της χρονιάς στην καφετέρια Floral στα Εξάρχεια της Αθήνας. Το event ξεκίνησε, όπως πάντα, κατά τις 11:00 το πρωί. Εκεί εμφανιστήκαμε ξανά, όσοι αγαπάμε το ανοικτό λογισμικό και μας ενδιαφέρει να συνεισφέρουμε όσο μπορούμε σε αυτό.

Οι συζητήσεις που έγιναν, πολλές! Επικράτησε (στην αρχή) η συζήτηση για το event που οργανώνεται στο ΤΕΙ του Πειραιά, το openFest 2011 (όταν φτιαχτεί και η σελίδα του event θα δώσω και το αντίστοιχο link). Το event θα λάβει χώρα μέσα στο Μάρτιο του 2011, δεδομένου ότι υπάρχουν και άλλα events του ανοικτού λογισμικού αργότερα, όπως η FOSSCOMM 2011 κ.λ.π. Εκεί έχω ζητήσει ήδη να κάνω μια παρουσίαση του FreeBSD Project που είναι ένα από τα αγαπημένα μου. Επίσης σε συνεργασία με την κοινότητα openSUSE μπορεί να με δείτε να κάνω κάποια παρουσίαση για την εν λόγω διανομή, ή τουλάχιστον να βοηθήσω στο στήσιμο ενός openSUSE booth. Αυτά είναι απλώς ιδέες και δεν είναι ακόμα τίποτα δρομολογημένο, αλλά οίδωμεν.

Όπως βλέπετε και στις φωτογραφίες, παρότι βρισκόμαστε τόσοι άνθρωποι από διαφορετικές κοινότητες και διανομές, διαφορετικού επιπέδου γνώσεων των εσωτερικών του αγαπημένου μας λειτουργικού συστήματος, φτιάχνουμε πάντα μια εύθυμη ατμόσφαιρα, με μπόλικο χαβαλέ και πειράγματα έτοιμα ο ένας για τον άλλο, αλλά ποτέ με παρεξηγήσεις. Ένα πολύ καλό χαρακτηριστικό που έχουμε είναι ότι τελικά ο ένας ενδιαφέρεται να βοηθήσει τον άλλο και όλοι μαζί να περάσουμε καλά, αλλά και να μάθουμε ο ένας από τον άλλο!

Εγώ ασχολήθηκα περισσότερο με το να ρυθμίσω μια εγκατάσταση openSUSE 11.3 σε ένα laptop και να εξηγήσω κάποια πράγματα που έχει αυτή η διανομή. Με την συγκεκριμένη διανομή ασχολούμαι πάρα πολλά χρόνια και είμαι αρκετά ευχαριστημένος με την απόδοσή της. Έτσι, τη συνιστώ και σε άλλους και τους βοηθάω στο να καταλάβουν τι ακριβώς είναι αυτό και πως λειτουργεί. Το ίδιο έκανα και στο εν λόγω event, μιας και για άλλη μια φορά βγήκε ο "καθηγητής" από μέσα μου :-P

Δυστυχώς, παρότι είχαμε μιλήσει με κάποια μέλη της κοινότητας openSUSE και ελπίζαμε να γνωριστούμε στο hackfest και να ανταλλάξουμε απόψεις σχετικά με την κοινότητα και τη διανομή, τελικά δε μπόρεσαν να έρθουν. Δεν πειράζει παιδιά. Ούτως ή άλλως θα υπάρξουν και άλλα events :-D

Τρίτη 2 Νοεμβρίου 2010

Αλλαγή Ελαττωματικού Σκληρού Δίσκου σε ZFS-Only FreeBSD ΣύστημαChanging of malfunctioned hard disc in a ZFS-Only FreeBSD system

Μιας και τα hardware failures δίνουν και παίρνουν τον τελευταίο καιρό, δεν ξέφυγα κι εγώ από την ανάγκη αντικατάστασης ενός σκληρού δίσκου σε FreeBSD Server με ZFS-Only σύστημα αρχείων!

Since hardware failures are very common (to me) lately, I fell in the need of replacing one hard disc in my ZFS-Only FreeBSD Server!

Πιο συγκεκριμένα, πριν από λίγες ημέρες και ενώ ξύπνησα το πρωί και έκανα λίγο chat με τα μέλη του Chania-LUG, κάποια στιγμή το γραφικό περιβάλλον στον υπολογιστή μου πάγωσε! Η οθόνη γέμισε με πράσινες γραμμές, το ποντίκι κόλλησε και γενικά το μηχάνημα σταμάτησε να αποκρίνεται. Η πρώτη κίνηση που έκανα ήταν να μπω στο σύστημα μέσω δικτύου με ssh (από το κινητό γιατί το να στήσω laptop τα χαράματα ήταν μια διαδικασία... Αλλά αυτό δεν έχει καμιά σημασία). Είδα ότι το σύστημα είχε απόκριση, αλλά αρκετά αργή. Το ίδιο έκανα και με τον browser, όπου έλεγξα ότι ο υπολογιστής ανταποκρίνεται σε http requests κ.λ.π. Βασικά έκανα έλεγχο σε όλες τις υπηρεσίες που ήθελα να δουλεύουν. Παντού το ίδιο. Το γραφικό περιβάλλον παγωμένο με τους μπλε και πράσινους κόκκους και γραμμές, ενώ οι υπηρεσίες δουλεύαν όλες, αλλά με αρκετά μικρότερη ταχύτητα απόκρισης. Φυσικά αφού το μηχάνημα έχει και γραφικό περιβάλλον θα καταλάβατε ότι το χρησιμοποιώ και σαν desktop :P

Specifically, few days ago I woke up in the morning, had some chat with the members of Chania-LUG, and in a while the graphical environment of my PC was frozen! The screen was filled by vertical green lines, the mouse cursor was stuck to a place and didn't follow my mouse moves and the computer stopped responding. My first move was to try to ssh into the frozen computer through my network (from my cellphone because it was a little bit hard to get my laptop out of its bag early in the morning... But this has nothing to do with the story). The connection was successful, meaning that the system was up and running! I made a connection to the apache server running on the defected machine, using again my cellphone's browser and I could see the web pages served, but in a very poor and slow transfer rate. I also checked every single service that were running... the same results. Frozen graphical environment with all those blue and green spots and lines, but the services were all up and running in a slower rate. Of course, since the PC as a graphical environment you understand that I also use it as a desktop :P

Η πρώτη μου σκέψη ήταν "Μπόρα είναι θα περάσει! Κάτι κάνει το μηχάνημα από πίσω και την κάνει τη δουλειά. Το απόγευμα που θα γυρίσω σπίτι από τη δουλειά θα είναι όλα μια χαρά!" Σωστά σκέφτηκα γιατί όντως το μηχάνημα έκανε δουλειά. Για την ακρίβεια το ZFS Subsystem δούλευε για λογαριασμό μου. Για την ακρίβεια διόρθωνε και έσωζε δεδομένα που έβρισκε εσφαλμένα, εξ αιτίας του σκληρού δίσκου...

My first thought was that it was something temporary, the machine was busy on doing something and that is the reason for all the slow performance. I believed that in the afternoon, when back from my work everything will be back to normal. Well, my thought was correct... the system was busy and more specifically the ZFS Subsystem. It was trying to save data from the broken hard drive...

Το απόγευμα και αφού γύρισα σπίτι, είδα το μηχάνημα στην ίδια ακριβώς κατάσταση. Ξαναέκανα τον έλεγχο των υπηρεσιών και την έπεσα για έναν υπνάκο μιας και έβλεπα πως θα χρειαζόμουν όλες μου τις δυνάμεις για να μπορέσω να δω τι γίνεται...

In the afternoon after coming back home I found the computer in the same state. I rechecked its services and I fell in bed; I needed all my strength to find out what is really going on and to recover it...

Όταν τελικά αποφάσισα να ξεκινήσω τη δουλειά της επιδιόρθωσης του προβλήματος, κράτησα σημειώσεις για όλα όσα έκανα γιατί ήταν ευκαιρία να ξεκινήσω ένα ωραιότατο how-to. Και φυσικά, πού αλλού θα το αναρτούσα; Στην πιο κατάλληλη σελίδα του συλλόγου, την FreeBSD World. Εκεί βρίσκεται τώρα αναρτημένη η σελίδα που περιγράφει όλη τη διαδικασία της αλλαγής του ελαττωματικού σκληρού δίσκου, χωρίς να χρειαστεί εγκατάσταση του λειτουργικού από την αρχή. Η ιδιαιτερότητα είναι, φυσικά, το ZFS Filesystem. Απολαύστε την και ελπίζω να βοηθήσει αρκετά όποιον πάθει μια από τα ίδια.

When I finally decided to start working on the computer's problem I noted down all the steps I followed, as it was a very nice opportunity to make a how-to for problems like that. Hard discs fail! So, we must be prepared! And of course, this how-to is posted, where else? in FreeBSD World. There is the post that describes the whole process of changing a malfunctioned hard disc drive, without reinstalling the operating system from the very beginning. The specificity of the post is the ZFS Filesystem. The post is in Greek language, so I will translate it here. I think it is helpfull for those of you running a ZFS FreeBSD installation and have problems with the hard disc...

What's in this article

2. Time to loose our uptime... (again...)

It is time to reboot the computer... Logging in through ssh (this time from my laptop) I send the magical command...

eliaschr@pluto:~ > su
Password:
pluto# shutdown -r now
pluto#

In a while I received the normal Connection to pluto closed. message. From that point on we have to work on the defected computer only; no more network party!

When the monitor went up again and showing kernel messages I noticed some

ad0: FAILURE - READ_DMA48 status=51 error=40 LBA=383250045
ad0: FAILURE - READ_DMA48 status=51 error=1 LBA=383250045
ZFS: vdev I/O failure, zpool=zroot path=/dev/gpt/disk0 offset=191928776192 size=120320 error=5
ZFS: zpool I/O failure, zpool=zroot error=5
.
.
.

and many more of that type... The hard drive was at its last. Hmmm. Time to study ZFS Administration Handbook, to see what tools ZFS offers for cases like ours.This document is also in printed form in my library, of course... Just in case (is it one?)

What really impressed me is the fact that even with a malfunctioned hard disc the system went up! But without the graphical environment. Even through the errors in hard disc's data, ZFS used its magic and data, even then, were in a way safe! I would never imagine that!

3. Should I take a Backup?
a. Some ZFS info

Of course the answer is well known. It's time to describe some small details on helper ZFS functions on that part. Though the word "partition" is totally different from ZFS "Storage Pool Dataset", in the following text I'm going to use the word "partition" as if it has the same meaning as "ZFS Dataset". The reason is that a new ZFS user may have not distinguished the differences well enough. In that way, I believe that the text will be clearer.

The first ZFS functionality we need to know is the creation of snapshots. Snapshots are also a kind of ZFS dataset that we can mount on our system and use them in the same way as Read-Only Partitions. Their starting size is very small, just enough to hold some information for the dataset that they are a snapshot of. While we change data and files in the original dataset, ZFS stores the old data in the snapshot and then alters them in the original dataset. This means that the size of a snapshot in our hard drive is as small as possible, because it stores only the differences from the original ZFS dataset that it derives from.

The second functionality that we must be aware of (we will not use it here) is the ability of making clones. Clones can start only from a snapshot. Specifically a clone is a copy of the files of a snapshot to another part of the hard disc, together with the unchanged files that are in the ZFS dataset the snapshot comes from. So, a clone can be used as another Read/Write partition that contains all the original files of a dataset at the time we took its snapshot. In a snapshot there are only the "first release" of the altered/deleted files, while in a clone there are all the files of the snapshoted dataset. Spot that there is a snapshot to clone relationship; the snapshot is the "parent" of the clone. This relationship can be reversed if we desire. For more information about clones download and read the ZFS Administration Handbook. We will not use clones in this how-to so we won't cover clones more.

The third functionality contains the power we need and is send/receive. It is very much alike with the well known dump/restore to FreeBSD users. ZFS has the ability to send a whole dataset in a stream. That stream can be either saved as a file, or pipe it, i.e. through ssh, to a remote system. Looks very much like dump(8). What we need to say is that send can only be used in a snapshot and not in an alive dataset!

The reversed function is receive that looks alike restore(8). receive takes the data from a stream and generates a dataset. So, we could create a copy of a local dataset to a remote machine using ssh and the ZFS functions send and receive.

Armoured with those capabilities we described we can understand that ZFS provides us with a whole toolset to create a backup of our datasets; either by using clones, or by making a kind of a dump file, or even by having a remote machine with the role of a replicated backup server in case of failure of our main machine!

b. System setup

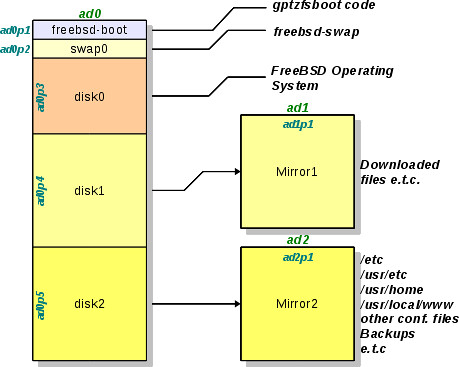
One thing we have to know is the system setup; the pools that exist in our system. In that way we can explain the state of the computer to find out what is going on. At the same time we will explain the reasons we decided to use this kind of real estate at the storage pools. The hard discs contained in the computer are one 1.5TB and two 500GB. The following diagram can bring some light and help us explain the whole setup:

A Testing ZFS Scheme

In the diagram the partitions of the hard discs are presented. In those disc partitions there will be the ZFS Storage Pools. The partitioning scheme is GPT and not the ordinary old geom(4).

The first 500GB of the hard disc are used for the operating system. Here there are the following partitions:

  • ad0p1: Boot Partition for the bootloader of the operating system. It has small size, 256KB are enough. Its partition type is freebsd-boot and contains the code of gptzfsboot.
  • ad0p2: Swap Partition for the virtual memory space of our operating system. Its size is 4GB and its type is freebsd-swap. The name of the partition is swap0
  • ad0p3: Here lies our operating system. The size of the artition is the rest of the first 500GB of the hard disc. Since there will be the ZFS Storage datasets, its type is freebsd-zfs.

In the last big part (the operating system's one) there are information that don't need to be mirrored. A failure in the operating system's part just needs another installation and nothing more.

There are other two big partitions on the disc of 1.5TB and they are both of size 500GB. These two partitions (ad0p4 and ad0p5 respectively) are mirrored by the two other hard discs of size 500GB each (ad1p1 and ad2p1 respectively). The reason that we do this mirroring is to have an automatic backup of our data to the other physical devices. In that way, whatever lies in partition ad0p4 it is also written in the hard disc ad1 and whatever lies in ad0p5 it is also written automatically in hard disc ad2.

One of the reasons we decided to use this configuration is the easiness of finding 500GB devices in a low price. So, it's a tactics we can use to be able to recover easily our system. At the same time, if a hard disc fails (which is the reason for this article's existance :)) then it is better to loose only 500GB of data than more (of course the best thing is not to loose a single bit, but...). In our case, the malfunctioned disc is, which one according to Murfy's Law, ad0 with capacity of 1.5TB. But even in that case the configuration we followed saved our data.

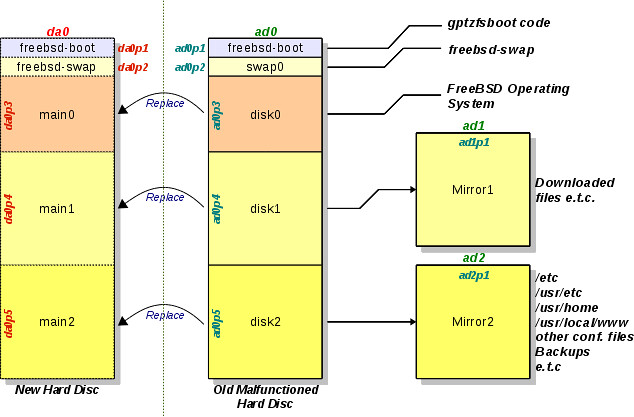
In order to be able to recover our system we need to have a new device of 1.5TB, that we will connect to the system externally on a USB. That means that the name of the new device will be da0. The following diagram presents the partitioning of the new hard drive and its relationship to the old malfunctioned one.

Replacing The Malfunctioned Disc

In the diagram the partitions are designed using dashed lines. This means that they do not exist and we have to create them. Don't forget that the new hard drive da0 is brand new.

Also, in the same diagram we can see that the partitions need to be copied are only three, ad0p3, ad0p4 and ad0p5. This is true because there is no need to copy neither the swap data, nor gptzfsboot code. The latter will be written in the new hard drive from the very beginning.

c. Check and data recovery

To be able to backup our data we must ensure that they are safe and correct. Only root user can perform such operations. Lets first check the state of the available ZFS Pools:

eliaschr@pluto:~ > su
Password:
pluto# zpool status -v #it could be -x as well
  pool: Common1
 state: ONLINE
status: The pool is formatted using an older on-disk format.  The pool can
        still be used, but some features are unavailable.
action: Upgrade the pool using 'zpool upgrade'.  Once this is done, the
        pool will no longer be accessible on older software versions.
 scrub: none requested
config:

        NAME             STATE     READ WRITE CKSUM
        Common1          ONLINE       0     0     0
          mirror         ONLINE       0     0     0
            gpt/disk1    ONLINE       0     0     0
            gpt/Mirror1  ONLINE       0     0     0

errors: No known data errors

  pool: Common2
 state: ONLINE
status: The pool is formatted using an older on-disk format.  The pool can
        still be used, but some features are unavailable.
action: Upgrade the pool using 'zpool upgrade'.  Once this is done, the
        pool will no longer be accessible on older software versions.
 scrub: none requested
config:

        NAME             STATE     READ WRITE CKSUM
        Common2          ONLINE       0     0     0
          mirror         ONLINE       0     0     0
            gpt/disk2    ONLINE       0     0     0
            gpt/Mirror2  ONLINE       0     0     0

errors: No known data errors

  pool: zroot
 state: ONLINE
status: One or more devices has experienced an unrecoverable error.  An
        attempt was made to correct the error.  Applications are unaffected.
action: Determine if the device needs to be replaced, and clear the errors
        using 'zpool clear' or replace the device with 'zpool replace'.
   see: http://www.sun.com/msg/ZFS-8000-9P
 scrub: none requested
config:

        NAME         STATE     READ WRITE CKSUM
        zroot        ONLINE       0     0     0
          gpt/disk0  ONLINE     198     0     0

errors: No known data errors
pluto#

Here we can see that the pool experienced unrecoverable error is the one that has contains the operating system, zrootTime to let ZFS to try to check the pool and recover whatever errors it can handle. This is how it is done:

pluto# zpool scrub
pluto# zpool status -v
  pool: Common1                                    
 state: ONLINE                                     
status: The pool is formatted using an older on-disk format.  The pool can
        still be used, but some features are unavailable.                 
action: Upgrade the pool using 'zpool upgrade'.  Once this is done, the   
        pool will no longer be accessible on older software versions.     
 scrub: none requested                                                    
config:                                                                   

        NAME             STATE     READ WRITE CKSUM
        Common1          ONLINE       0     0     0
          mirror         ONLINE       0     0     0
            gpt/disk1    ONLINE       0     0     0
            gpt/Mirror1  ONLINE       0     0     0

errors: No known data errors

  pool: Common2
 state: ONLINE 
status: The pool is formatted using an older on-disk format.  The pool can
        still be used, but some features are unavailable.                 
action: Upgrade the pool using 'zpool upgrade'.  Once this is done, the   
        pool will no longer be accessible on older software versions.
 scrub: none requested
config:

        NAME             STATE     READ WRITE CKSUM
        Common2          ONLINE       0     0     0
          mirror         ONLINE       0     0     0
            gpt/disk2    ONLINE       0     0     0
            gpt/Mirror2  ONLINE       0     0     0

errors: No known data errors

  pool: zroot
 state: ONLINE
status: One or more devices has experienced an unrecoverable error.  An
        attempt was made to correct the error.  Applications are unaffected.
action: Determine if the device needs to be replaced, and clear the errors
        using 'zpool clear' or replace the device with 'zpool replace'.
   see: http://www.sun.com/msg/ZFS-8000-9P
 scrub: scrub completed after 23h20m with 0 errors on Mon Oct 18 23:54:39 2010
config:

        NAME         STATE     READ WRITE CKSUM
        zroot        ONLINE       0     0     0
          gpt/disk0  ONLINE     249     0     0  256K repaired

errors: No known data errors
pluto#

After many hours of hard work, ZFS made its miracle! It recovered all the errors it found.

d. Data backup

To backup our data we need to follow two steps. The first is to make a snapshot of the datasets we want to backup and then we need to create the backup file fro the snapshot. The best way to do the latter in a mulfunctioned system is the ZFS send:

pluto# zfs list
NAME                            USED  AVAIL  REFER  MOUNTPOINT
Common1                         274G   182G   274G  /Common
Common2                         224G   233G    18K  /Common2
Common2/Backups                73,1G   233G  73,1G  /Common/Backups
Common2/Datasheets             7,43G   233G  7,43G  /Common/Datasheets
Common2/Documentation Section  3,22G   233G  3,22G  /Common/Documentation Section
Common2/ECh Documents          21,4G   233G  21,4G  /Common/ECh Documents
Common2/Pictures               13,4G   233G  13,4G  /Common/Pictures
Common2/home                    105G   233G   105G  /usr/home
Common2/www                     275M   233G   275M  /usr/local/www
zroot                           107G   346G   221M  legacy
zroot/tmp                       380M   346G   380M  /tmp
zroot/usr                      19,5G   346G  14,6G  /usr
zroot/usr/ports                4,64G   346G   270M  /usr/ports
zroot/usr/ports/distfiles      4,38G   346G  4,38G  /usr/ports/distfiles
zroot/usr/ports/packages         18K   346G    18K  /usr/ports/packages
zroot/usr/src                   303M   346G   303M  /usr/src
zroot/var                      2,32G   346G  13,5M  /var
zroot/var/crash                1024M   346G  1024M  /var/crash
zroot/var/db                   1,15G   346G  1,09G  /var/db
zroot/var/db/pkg               58,6M   346G  58,6M  /var/db/pkg
zroot/var/empty                  18K   346G    18K  /var/empty
zroot/var/log                  92,4M   346G  92,3M  /var/log
zroot/var/mail                  200K   346G   200K  /var/mail
zroot/var/run                   130K   346G   111K  /var/run
zroot/var/tmp                  67,3M   346G  67,3M  /var/tmp
pluto# zfs snapshot -r zroot/var@2010-10-20
pluto# zfs snapshot -r zroot/tmp@2010-10-20
pluto# zfs snapshot -r zroot/usr@2010-10-20
pluto# zfs snapshot zroot@2010-10-20
pluto# zfs list -t snapshot
NAME                                   USED  AVAIL  REFER  MOUNTPOINT
zroot@2010-10-20                        98K      -   221M  -         
zroot/tmp@2010-10-20                      0      -   380M  -         
zroot/usr@2010-10-20                   326K      -  14,6G  -         
zroot/usr/ports@2010-10-20                0      -   270M  -         
zroot/usr/ports/distfiles@2010-10-20      0      -  4,38G  -         
zroot/usr/ports/packages@2010-10-20       0      -    18K  -         
zroot/usr/src@2010-10-20                  0      -   303M  -         
zroot/var@2010-10-20                    21K      -  13,5M  -         
zroot/var/crash@2010-10-20                0      -  1024M  -         
zroot/var/db@2010-10-20                156K      -  1,09G  -         
zroot/var/db/pkg@2010-10-20               0      -  58,6M  -         
zroot/var/empty@2010-10-20                0      -    18K  -         
zroot/var/log@2010-10-20              85,5K      -  92,3M  -         
zroot/var/mail@2010-10-20                 0      -   200K  -         
zroot/var/run@2010-10-20                19K      -   111K  -         
zroot/var/tmp@2010-10-20                  0      -  67,3M  -         
pluto#

Snapshots are ready. Don't forget that snapshots are like partitions and can be mounted like any other partition. The only difference is that they contain only the old version of the files altered since the making of the snapshot and indexes to the unaltered ones.

Now we need to create copies of the snapshots but having all the files (not indexes). The real problem is the destination of the copies. If we connect an external drive at computer's USB then it is more likely that it will be formated using FAT32 or NTFS filesystem. FAT32 has the problem of maximum file size of 4GB. This is not appropriate for our situation because the data we need to backup are more than this maximum file size... In contrary NTFS can handle very large files but in FreeBSD fuse-ntfs is very unstable. It is very easy to have problems during writing to NTFS and have a very beautiful kernel core dump! So, we avoid using it.

The solution is our internal mirrored setup. The good thing about the existence of two mirrors is that the same data are in two hard discs at the same time. So, if one of them starts failing during a write cycle, ZFS knows well how to handle then and to keep the correct ones using the mirrored drive. Alternatively, we could run a ssh server in a remote machine in our network and send the backup there. There are solutions for everybody's taste! :P

Time for the real backup:

pluto# zfs send -Rv zroot/usr@2010-10-20 > /Common2/usr.20101020
.
.
.
pluto# zfs send -Rv zroot/tmp@2010-10-20 > /Common2/tmp.20101020
.
.
.
pluto# zfs send -Rv zroot/var@2010-10-20 > /Common2/var.20101020
.
.
.
pluto# zfs send -v zroot@2010-10-20 > /Common2/root.20101020
.
.
.
pluto# ls -l /Common2
-rw-r--r--  1 root  wheel    240931640 21 Οκτ 00:25 root.20101020
-rw-r--r--  1 root  wheel    563447860 20 Οκτ 22:27 tmp.20101020
-rw-r--r--  1 root  wheel  22777054676 20 Οκτ 20:08 usr.20101020
-rw-r--r--  1 root  wheel   4975268576 20 Οκτ 22:07 var.20101020
pluto#

Four files created form the backup of the whole operating system. The backup files were created in the second mirror. During ZFS send there are some warning messages, but that is normal due to ad0 hard disk malfunction.

4. Replacing the old malfunctioned hard disc

Since we are done with the backup, it is time to replace the malfunctioned device. We need to avoid installation of a new operating system (since we are able to do that) and transfer all the ZFS Pools in the new device to avoid the rest discomfort.

a. Preparation of the new hard drive

There is no need to power off the computer for this step, nor to have an empty SATA connector on our motherboard. Copying ZFS Pools/Datasets from a hard drive to another requires the new hard disc to be partitioned, like the old one. That is the preparation we need to apply to the new device. We will repeat the steps we made during the first time we installed FreeBSD on ZFS. The difference is that we will perform these actions on the hard drive connected to USB. When we connect the new hard drive using a SATA to USB converter we will see some kernel messages:

Oct 23 10:43:21 pluto kernel: ugen4.2:  at usbus4
Oct 23 10:43:21 pluto kernel: umass0:  on usbus4
Oct 23 10:43:21 pluto kernel: umass0:  SCSI over Bulk-Only; quirks = 0x4000
Oct 23 10:43:23 pluto kernel: umass0:2:0:-1: Attached to scbus2
Oct 23 10:43:23 pluto kernel: da0 at umass-sim0 bus 0 scbus2 target 0 lun 0
Oct 23 10:43:23 pluto kernel: da0:  Fixed Direct Access SCSI-2 device
Oct 23 10:43:23 pluto kernel: da0: 40.000MB/s transfers
Oct 23 10:43:23 pluto kernel: da0: 1430799MB (2930277168 512 byte sectors: 255H 63S/T 182401C)

It is clear from these messages that the system uses the name da0 to access the newly connected hard disc. Caution is needed when writing the name of the drive, because it is very easy to mistype it to ad0 which is the old malfunctioned one! The partitioning is made in the following way:

pluto# gpart destroy # may fail
pluto# gpart create -s gpt da0 # Create gpt scheme on external hard disc
pluto# gpart add -s 256K -t freebsd-boot da0 # Create the boot loader's partition
pluto# gpart add -s 4G -t freebsd-swap da0 # Do not label it yet

The two first partitions are created, one for bootcode and another for swap memory. The latter does not have a label yet, because the name we want to give to it is the same as the one already in use by the system. To write the boot code we must execute the following command:

pluto# gpart bootcode -b /boot/pmbr -p /boot/gptzfsboot -i 1 da0
pluto#

If the command fails with a message that there is already a boot code written in the Boot Record then we just omit the command line switch -b, meaning:

da0 has bootcode
pluto# gpart bootcode -p /boot/gptzfsboot -i 1 da0
pluto#

It is very difficult to remember the exact size of the partitions disk0, disk1 and disk2 of the base hard drive (the malfunctioned one), it is a very good approach to ask gpart to show us:

pluto# gpart list ad0
Geom name: ad0             
fwheads: 16                
fwsectors: 63              
last: 2930275021           
first: 34                  
entries: 128               
scheme: GPT                
Providers:                 
1. Name: ad0p1             
   Mediasize: 262144 (256K)
   Sectorsize: 512         
   Mode: r0w0e0            
   rawtype: 83bd6b9d-7f41-11dc-be0b-001560b84f0f
   label: (null)                                
   length: 262144                               
   offset: 17408                                
   type: freebsd-boot                           
   index: 1                                     
   end: 545                                     
   start: 34                                    
2. Name: ad0p2                                  
   Mediasize: 4294967296 (4.0G)                 
   Sectorsize: 512                              
   Mode: r1w1e1                                 
   rawtype: 516e7cb5-6ecf-11d6-8ff8-00022d09712b
   label: swap0                                 
   length: 4294967296                           
   offset: 279552                               
   type: freebsd-swap                           
   index: 2                                     
   end: 8389153                                 
   start: 546                                   
3. Name: ad0p3                                  
   Mediasize: 495790956544 (462G)               
   Sectorsize: 512                              
   Mode: r1w1e2                                 
   rawtype: 516e7cba-6ecf-11d6-8ff8-00022d09712b
   label: disk0                                 
   length: 495790956544                         
   offset: 4295246848                           
   type: freebsd-zfs                            
   index: 3                                     
   end: 976730865                               
   start: 8389154                              
4. Name: ad0p4                                  
   Mediasize: 500107862016 (466G)               
   Sectorsize: 512                              
   Mode: r1w1e2                                 
   rawtype: 516e7cba-6ecf-11d6-8ff8-00022d09712b
   label: disk1                                 
   length: 500107862016                         
   offset: 500086203392                         
   type: freebsd-zfs                            
   index: 4                                     
   end: 1953504033                              
   start: 976730866                             
5. Name: ad0p5                                  
   Mediasize: 500106745856 (466G)               
   Sectorsize: 512                              
   Mode: r1w1e2                                 
   rawtype: 516e7cba-6ecf-11d6-8ff8-00022d09712b
   label: disk2                                 
   length: 500106745856                         
   offset: 1000194065408                        
   type: freebsd-zfs                            
   index: 5                                     
   end: 2930275021                              
   start: 1953504034                          
Consumers:                                      
1. Name: ad0                                    
   Mediasize: 1500300828160 (1.4T)              
   Sectorsize: 512                              
   Mode: r4w4e11                                

pluto#

The needed partitions are labelled disk0, disk1 and disk2, meaning those with index numbers 3, 4 and 5, respectively. In every block presented there are two values we need to consider. The first one is start and the second one is end. To figure out the size we need to pass to the following commands we must calculate end-start+1. For the showed partitions we have:

Label Start End Calculated Length
disk0 8389154 976730865 976730865 -8389154 +1 = 968341712
disk1 976730866 1953504033 1953504033 -976730866 +1 = 976773168
disk2 1953504034 2930277134 2930277134 -1953504034 +1 = 976773101

Knowing those values we can create the new partitions with exactly the same size as the old ones. The size we calculated is in number of blocks. The labels of the new partitions will be main0, main1 and main2, respectively (we cannot use the same labels as the ones already used by the system). For the last partition there is no need to specify size value. The system will occupy the rest of the free space of the device, without leaving unused space.

pluto# gpart add -s 968341712 -t freebsd-zfs -l main0 da0
pluto# gpart add -s 976773168 -t freebsd-zfs -l main1 da0
pluto# gpart add -t freebsd-zfs -l main2 da0
pluto#

Now the new hard disc drive is ready to replace the old malfunctioned one. The only step left is to copy the data.

b. Replacing the ZFS pools

ZFS has unbelievable power to administer its filesystems. It can even replace its pools! This is the ability we will use now:

pluto# zpool replace zroot gpt/disk0 gpt/main0
pluto# zpool status zroot
  pool: zroot
 state: ONLINE
status: One or more devices is currently being resilvered.  The pool will
        continue to function, possibly in a degraded state.
action: Wait for the resilver to complete.
 scrub: resilver in progress for 0h4m, 1,15% done, 6h15m to go
config:

        NAME           STATE     READ WRITE CKSUM
        zroot          ONLINE       0     0     0
          replacing    ONLINE       0     0     0
            gpt/disk0  ONLINE     259     0     0
            gpt/main0  ONLINE       0     0     0  1,23G resilvered

errors: No known data errors
pluto#

The first command (replace) starts a process called resilvering. Of course, this process takes a lot of time. ZFS Subsystem does whatever is needed in the background, leaving the user to perform other tasks as usual. The only difference is that the performance of the computer drops, something that is already true due to the malfunctioned hard disc. The second one (status) can be executed from time to time to see the status of the resilvering process. When resilvering of the pool finishes we can start the resilvering of the two other ZFS Pools. Use the following commands:

pluto# zpool replace Common1 gpt/disk1 gpt/main1 #wait until this process is finished and then...
pluto# zpool replace Common2 gpt/disk2 gpt/main2 #again, wait until the end of the process
pluto#

Finally, when all the resilvering of all available pools finishes, the new hard disc will contain all the data that could be recovered from the old one. ZFS subsystem will use the new pools that are now in the new hard drive. Time to power off the machine and replace the old malfunctioned device with the new one in the PC box.

pluto# shutdown -p now
5. WE ARE NOT DONE!!!!

OOOPS! What happened? Why the system does not boot up?

While trying to boot our machine with the new drive, just after the loader's menu we stay in mountroot with the notification that zfs:zroot could not be mounted! Whatever we do the system cannot boot our operating system. This makes us think that something is wrong with zpool.cache file. This file, in short, contains information for the structure of the ZFS pools and it is very important for the correct boot of the system. During the resilvering process this file was copied from the old hard disc, but its contained information describe the pools of the old device. So, these information do not match the new pools.

I believe you noticed that the labels of the gpt partitions are not the same as those applied in the old hard disc device but this is not a problem for the ZFS subsystem as we will see shortly. ZFS knows its pools by a unique ID that it applies to the pools at the time of their creation.

a. Changing of the labels of gpt partitions

In this procedure described here, the only mandatory part is to give swap partition the label that had in its previous device. This is convenient for us to avoid altering the /etc/fstab file. The rest are not necessary to be applied. We just restore the old labels for clarity, because we were used to them and not for any other reason. We will proove it here. The following procedure demands us to boot from livefs and use the Fixit console. There, we can check the state of the ZFS Pools.

Fixit# #lets load the zfs subsystem
Fixit# kldload /mnt2/boot/kernel/opensolaris.ko
Fixit# kldload /mnt2/boot/kernel/zfs.ko
Fixit# export LD_LIBRARY_PATH=/mnt2/lib

These commands must be executed every time we use Fixit console to be able to use the ZFS filesystem and access our ZFS Pools. Time for the pools check:

Fixit# zpool import
  pool: Common1
    id: 16786791901886102938
 state: ONLINE
action: The pool can be imported using its name or numeric identifier
config:

        NAME             STATE     READ WRITE CKSUM
        Common1          ONLINE       0     0     0
          mirror         ONLINE       0     0     0
            gpt/main1    ONLINE       0     0     0
            gpt/Mirror1  ONLINE       0     0     0

errors: No known data errors

  pool: Common2
    id: 2880185314831596717
 state: ONLINE
action: The pool can be imported using its name or numeric identifier
config:

        NAME             STATE     READ WRITE CKSUM
        Common2          ONLINE       0     0     0
          mirror         ONLINE       0     0     0
            gpt/main2    ONLINE       0     0     0
            gpt/Mirror2  ONLINE       0     0     0

errors: No known data errors

  pool: zroot
    id: 1188189039061593219
 state: ONLINE
action: The pool can be imported using its name or numeric identifier
config:

        NAME         STATE     READ WRITE CKSUM
        zroot        ONLINE       0     0     0
          gpt/main0  ONLINE       0     0     0

errors: No known data errors
Fixit#

Here we can see that the gpt partitions used by the pools are the correct ones. So, it is not really necessary to change their labels. Also, observe the id number. This is the unique number we mentioned earlier.

To change the gpt labels we have to use the following commands:

Fixit# gpart modify -i 2 -l swap0 ad0 #label the swap partition as swap0
Fixit# gpart modify -i 3 -l disk0 ad0
Fixit# gpart modify -i 4 -l disk1 ad0
Fixit# gpart modify -i 5 -l disk2 ad0

The biggest problem we have on zpool.cache file creation is that the pools must be imported normally and not using altroot. This forbids us from using -R command line switch in import command. And this in turn brings us more trouble because zroot, when mounted, sits over the already existed Fixit system and replaces everything, and the file we need is copied from a system before we use it! Wrong file! We have to find a solution to have the correct zpool.cache file and this is done in two steps. First we must import zroot using altroot to be able to set the mountpoints.

Fixit# zpool import -fR /zroot zroot
Fixit# zpool import -f Common1
Fixit# zpool import -f Common2
Fixit# zfs unmount -a
Fixit# zfs set mountpoint=none zroot
Fixit# zpool export Common2
Fixit# zpool export Common1
Fixit# zpool export zroot
Fixit#

What we achieved with this is that the system does not complain when we import the pools, warning us that we need to use -f option and, second, zroot's main filesystem does not automatically get mounted, so it does not replace the files of Fixit console. Now, the new problem is that /boot/zfs directory of zroot is not available so we can not write any file into it.

To be able to create zpool.cache, the directory /boot/zfs must be existed. This is not true in the Fixit console so we have to create the directory in question by ourselves:

Fixit# mkdir /boot/zfs
Fixit#

zpool.cache now will be created automatically when we import the pools. So:

Fixit# zpool import zroot
Fixit# zpool import Common1
Fixit# zpool import Common2
Fixit#

At that point /boot/zfs/zpool.cache file is created with the valid information that ZFS system needs to be operative. The only thing left is to copy this file into another part of zroot that is already accessible. The place we choose is the /tmp directory. After the copy we will unmount the filesystems and restore the mountpoint we altered earlier.

Fixit# cp /boot/zfs/zpool.cache /tmp
Fixit# zfs unmount -a
Fixit# zfs set mountpoint=/ zroot
Fixit# zpool export Common2
Fixit# zpool export Common1
Fixit# zpool export zroot

Now we are in position to copy the new zpool.cache in its correct place in zroot and to restore th final mountpoint as it should be for the system to get propperly boot-up.

Fixit# zpool import -fR /zroot zroot
Fixit# zpool import -f Common1
Fixit# zpool import -f Common2
Fixit# cp /zroot/tmp/zpool.cache /zroot/boot/zfs/
Fixit# zfs unmount -a
Fixit# zfs set mountpoint=legacy zroot
Fixit# reboot
.
.
.

If all things are done correctly after restarting, out FreeBSD will finally boot, without any problems from the new hard disc drive. Do not forget that we had a malfunctioned hard disc and its data could be corrupted making the operating system unusable...

To everybody who started to use this article and change a malfunctioned hard disc drive, I wish you good luck. May the source be with you!

Ηλίας Χρυσοχερης

Elias Chrysocheris

Κυριακή 3 Οκτωβρίου 2010

Athens Digital Week 2010 - Το Πρόγραμμα και το Δελτίο Τύπου


Athens Digital Week 2010 Banner

Βγήκαν το Δελτίο Τύπου και το Πρόγραμμα του Athens Digital Week 2010. Η διοργάνωση θα λάβει χώρα στο Τεχνόπολις του Δήμου Αθηναίων στο Γκάζι από τις 7 έως τις 10 Οκτωβρίου.

Το Athens Digital Week είναι το φεστιβάλ τεχνολογίας που διοργανώνει ο Δήμος Αθηναίων, με:

Επίσης, φέτος τελεί υπό την αιγίδα:

Να υπενθυμίσω ότι στις 9 Οκτωβρίου θα γίνει ομιλία και παρουσίαση του FreeBSD Project και θα μοιραστούν και DVD της Custom Διανομής FreeBSD του Μανώλη Κιαγιά με XFCE πακέτα. Αναλυτικά ανατρέξτε στο πρόγραμμα της διοργάνωσης. Ελπίζουμε να δούμε πολλούς φίλους του FreeBSD εκεί, καθώς και άλλο κόσμο που θα ενδιαφερθεί να γνωρίσει το FreeBSD μέσα από την εν λόγω παρουσίαση.

Άλλοι σχετικοί σύνδεσμοι:

Κυριακή 26 Σεπτεμβρίου 2010

Νέος IRC Server για τον Chania-LUGNew IRC Server for Chania-LUG

Μετά από κάμποση σκέψη, είπαμε στο Σύλλογο Φίλων Ανοικτού Λογισμικού Χανίων να φτιάξουμε έναν IRC server, έτσι ώστε να μπορούμε να μπαίνουμε εκεί και να κάνουμε chat για οποιοδήποτε θέμα. Φυσικά, δεν λείπουν τα καλαμπούρια, ο χαβαλές και το πείραγμα από τα μέλη της ομάδας προς άλλα μέλη :). Είναι γνωστό σε όσους μας έχουν γνωρίσει ότι στην ομάδα μας επικρατεί ένα εύθυμο κλίμα και αυτό συνεχίζεται και στο chat.

After a lot of thinking, in the club of Chania-LUG we made the decision to build an IRC server, so we can join our channel and chat for every matter we need. Of cource, jokes, teasing and flames are also present from the club's members :). It is well known that in our team we believe that fun should be a part of the club and that also stays true in our channel.

Για όποιον ενδιαφέρεται να έρθει σε επαφή μαζί μας μπορεί να χρησιμοποιήσει έναν IRC Client όπως το pidgin, το Konversation και άλλους και να συνδεθεί στο κανάλι μας. Τα στοιχεία που χρειάζεστε είναι:

To everybody who wants to keep in touch with us, he can use an IRC client application like pidgin, Konversation or whatever other he/she wishes and join our channel. The needed settings are:

  • Server: apollo.chania-lug.gr
  • Port: 6667
  • Κανάλι: #chania-lugChannel: #chania-lug

Ξέρουμε ότι το όνομα του καναλιού πρωτοτύπισε :)

We know that the channel's name is very... innovative :)

Θα χαρούμε να σας μιλήσουμε και να σας λύσουμε τις απορίες σας, ή ακόμα και να έχουμε κάποιο ευδιάθετο flame :).

We will be glad to talk to you, give solutions to problems you may have, or even flame with you for a matter :).

Δευτέρα 13 Σεπτεμβρίου 2010

Συμμετοχή στο Athens Digital Week 2010Participation in Athens Digital Week 2010

Είναι γνωστό σε όσους ασχολούνται με την ψηφιακή τεχνολογία, πως κάθε χρόνο υπάρχει ένα συνέδριο στην Αθήνα με την ονομασία Athens Digital Week. Φέτος, για τρίτη συνεχή χρονιά, η Τεχνόπολις του Δήμου Αθηναίων φιλοξενεί το ADW2010. Είναι η μεγαλύτερη διοργάνωση για τις νέες τεχνολογίες της εποχής μας. Με τη βοήθειά της, χιλιάδες επισκέπτες κάθε χρόνο βλέπουν τα εντυπωσιακά επιτεύγματα της ψηφιακής τεχνολογίας και έχουν την ευχέρεια να ενημερωθούν για αυτά. Για περισσότερες πληροφορίες μπορείτε να δείτε στην ιστοσελίδα του Athens Digital Week

It is popular enough to everybody that gets involved with digital technology, that every year there is a conference in Athens, called Athens Digital Week. This year, for the third consecutive time, Technopolis of Municipality of Athens hosts the ADW2010. It is the biggest event on new technologies. There, thousands of visitors can see the impressive accomplishments of Digital Tecnology and they have the oportunity to be informed on them. You can get more information on the event at its website (Athens Digital Week)

Φέτος είχα την τιμή να συμμετάσχω κι εγώ σε αυτή την οργάνωση, βάζοντας το δικό μου λιθαράκι στην ενημέρωση για τις νέες τεχνολογίες όσον αφορά τον χώρο των λειτουργικών συστημάτων. Βοηθάει το γεγονός πως αυτή τη σχολική χρονιά θα βρίσκομαι στην Αθήνα και έτσι δεν θα χρειαστεί να μετακινηθεί άλλο μέλος του Συλλόγου Φίλων Ανοικτού Λογισμικού Χανίων - Chania-LUG (δηλαδή ο Μανώλης :)). Συγκεκριμένα, έπειτα από παρότρυνση του Γιώργου Κεραμίδα και του Μανώλη Κιαγιά, η ομιλία μου θα είναι για το FreeBSD.

This year I had the honor to be a part of the event, adding my little "stone of help" to the informing for the new technologies concerning the computer operating systems. It is a very good thing that this year I will be in Athens, so there is no necessity for some other member of Chania-LUG (meaning Manolis :)) to travel there for the presentation. More specifically, after the prompting of George Keramidas and Manolis Kiagias, my speech will be for FreeBSD.

Με το εν λόγω λειτουργικό άρχισα να ασχολούμαι το Σεπτέμβριο του 2009 και ομολογώ πως με έχει κατενθουσιάσει με τη σταθερότητά του και την ανοχή του σε κάθε είδους ανισορροπίες του νέου χρήστη. Άλλο ένα χαρακτηριστικό του είναι η ασφάλεια, κάτι που λειτουργικά σαν τα γνωστά Windows (εγώ τα λέω Bugindows) δεν έχουν ιδέα ακόμα το τι σημαίνει! Ναι! Γίνομαι κακός, το ξέρω, αλλά είναι η πραγματικότητα.

I started with thos operating system on September 2009 and I admit that I'm very thrilled with its stability, and tollerance in every newcomer user's nonsense. Another feature of it is security, something not known to famous operating systems as Windows (I call it Bugindows)! Yes! I know, I'm mean, but this is true.

Μια πρόχειρη δομή της παρουσίασης δίνεται ακολούθως:

A draft from the presentation follows:


ΕισαγωγήIntroduction
  • Tι είναι το FreeBSDWhat is FreeBSD
  • Ποιος είναι ο σκοπός τουWhat is its purpose
  • Τι άδειες χρήσης χρησιμοποιεί και για ποιο λόγοWhat are the applicable User's Licenses
  • Σύγκρισή του με τα άλλα λειτουργικά *BSDComparison of different flavours of *BSD
  • Εκδόσεις του και γραμμές ανάπτυξηςReleases and branches
  • Που το βρίσκουμε και το κατεβάζουμεWhere we can find and download it
  • Πληροφορίες σχετικά με το FreeBSD, τη χρήση του και την εγκατάστασή τουInformation of FreeBSD, its installation and usage
  • Πληροφορίες και αναφορές προβλημάτωνInformation about problems and workarounds and problem reports

Ασφάλεια - Security
  • Παρακολούθηση συστήματος - CronSystem observation - Cron
  • Kernel Security Level
  • Firewalls (pf, ipfw)
  • Jails
  • Mandatory Access Control (MAC)

Τεχνολογίες που προέρχονται από το openSolarisTechnologies adopted by openSolaris
  • Zettabyte File System (ZFS)
  • DTrace

Ξέρετε καλά πως θα μπορούσα να μιλάω για ώρες ολόκληρες σχετικά με το θέμα, αλλά δυστυχώς ο χρόνος ομιλίας είναι περιορισμένος (καλό για τους επισκέπτες αυτό! :D). Ελπίζω να παρευρεθείτε στην ομιλία και να βρείτε ενημερωτική τη διάλεξη, καθώς και όλες τις διαλέξεις στη διοργάνωση του ADW2010.

You know that I could speak for hours about FreeBSD, but the time limit of the speech is narrow (good for the visitors! :D). I hope I see you in the speech room and find the speech very informative, and of cource, all the rest of the speeches in the event.

Θα ήθελα να ευχαριστήσω τον Βασίλη Βλάχο για τη διοργάνωση και την πρότασή του στον Γιώργο για την ομιλία του FreeBSD. Επίσης, θα ήθελα να ευχαριστήσω τον Γιώργο Κεραμίδα και τον Μανώλη Κιαγιά για την εμπιστοσύνη τους να με αφήσουν να κάνω εγώ αυτή την ομιλία. Θεωρώ τον εαυτό μου ένα νέο χρήστη στο χώρο του FreeBSD και ξέρω ότι έχω να μάθω ακόμα πολλά! Πάρα πολλά!

I would like to thank Vasilis Vlachos for organizing the event and his proposal to George for the FreeBSD speech. I would also like to thank George Keramidas and Manolis Kiagias for their trust, to propose me to give this speech. I consider myself as a newcomer to the FreeBSD family, and I know very well that there is still so much I have to learn from that!

Περιττό, βέβαια, να αναφέρω πως η παρουσίαση είναι γραμμένη σε Beamer, έτσι;

I guess it is not necessary to tell you that the presentation is made in Beamer, right?

Και για να μην ξεχνιόμαστε:

And don't forget:

Athens Digital Week 2010 Banner

Σάββατο 21 Αυγούστου 2010

Packard Bell (Acer) και service

Ξεκινάω την ιστορία μου με μια αναδρομή...

Τον Ιανουάριο του 2009 αποφάσισα με συνοπτικές διαδικασίες (ως συνήθως) να αποκτήσω ένα laptop δυνατό και με μεγάλη οθόνη. Μια 17" οθόνη ήταν ό,τι έπρεπε για να κάνω τις σχεδιάσεις των ηλεκτρονικών κυκλωμάτων και πλακετών μου. Επίσης, σε μια τόσο μεγάλη οθόνη μπορείς να γράφεις και κώδικα με μεγάλη άνεση, βλέποντας ταυτόχρονα δύο αρχεία. Σημαντικό, τόσο για προγραμματισμό σε γλώσσα C/C++ όσο και σε assembly για τους μικροελεγκτές που χρησιμοποιώ. Κατέληξα σε ένα laptop της εταιρίας Packard Bell, το EasyNote SJ82, το οποίο διαθέτει οθόνη 17", δύο σκληρούς δίσκους, πληκτρολόγιο μαζί με το αριθμητικό κομμάτι, κάρτα γραφικών NVidia γκαζάτη και γενικά το μηχάνημα στη συμπεριφορά του είναι πραγματικά άψογο.

Αυτό βέβαια, όταν λειτουργεί :Ρ. Τι εννοώ; πέρυσι το Σεπτέμβριο, μια ωραία ημέρα ξεκίνησε να μην αναγνωρίζει ότι υπάρχει επάνω του και DVD Recorder! Δεν έβλεπε καν τη συσκευή!... Και ήταν η εποχή που οργανώναμε τη Software Freedom Day 2009 και έπρεπε να "κάψω" κάμποσα CDάκια... Χμμμ! Η μόνη λύση που είχα ο άνθρωπας ήταν να αγοράσω ένα εξωτερικό DVD Recorder και να το τσακίσω στις εγγραφές. Αυτό και έκανα. Μέχρι και τις ημέρες του Αντιρατσιστικού Φεστιβάλ στα Χανιά, στο οποίο και μας είχαν ζητήσει να συμμετέχουμε, το laptop άρχισε να ζορίζεται να ανάψει. Το άναβα, την πρώτη φορά έπαιρναν μπροστά τα ανεμιστηράκια και τα ενδεικτικά λαμπάκια, αλλά από τις υπόλοιπες λειτουργίες... πράααααμα! (που λέμε κι εμείς οι Κρητικοί...). Το έσβηνα και το ξανα-άναβα και έπαιρνε μπροστά κανονικά. Αρχικά με τη δεύτερη. Μετά με την τρίτη φορά, κ.λ.π. Κάποια στιγμή παρέδωσε το πνεύμα του, αλλά για καλή μου τύχη αφού όλες οι παρουσιάσεις και τα events που είχαμε οργανώσει σαν σύλλογος.

Το laptop ήταν 9 μηνών και φυσικά μέσα στην εγγύηση που παρείχε η εταιρία (2 χρόνια). Οπότε, τι άλλο; το έστειλα για επισκευή. Η εταιρία που είχε το service της Packard Bell στην Ελλάδα ήταν η CPI. Το laptop ξαναήρθε στα χέρια μου σε 10 ημέρες συνολικά. Πολύ καλός χρόνος αν βάλουμε μαζί το Σαββατοκύριακο που μεσολαβούσε και τις ημέρες μεταφοράς. Δηλαδή οι άνθρωποι μέσα σε 6 εργάσιμες ημέρες το είχαν έτοιμο!. Τι είχε πάθει; Μητρική πλακέτα!...

Στις αρχές του 2010 η Packard Bell αγοράστηκε από την ACER... Με ό,τι αυτό συνεπάγεται... Γενικά για να είμαι ειλικρινής δεν τρέφω και τις καλύτερες εντυπώσεις για την τελευταία... Αλλά τι να κάνω, το πίνω το ποτήρι. Και γιατί λέω το πίνω; Θα καταλάβετε στη συνέχεια...

Φέτος τον Ιούνιο, τριγύρω στις 10 του μήνα, το laptop άρχισε πάλι να κάνει τα ίδια. Αρχικά να ανάβει με τη δεύτερη φορά και την επόμενη ημέρα... καθόλου! Και τότε οι δουλειές ήταν στο Full! Οργάνωση της Πρόσθετης Διδακτικής Στήριξης (ΠΔΣ ή αλλιώς ΠιΔήΣι! :D), Κυκλώματα που έπρεπε να αποτελειώσω, προγράμματα, τόσο σε μικροελεγκτές όσο και για το KDE, ιστοσελίδες κ.λ.π. Έφυγε η γη κάτω από τα πόδια μου, γιατί άρχισα να λέω στους τριγύρω, οι οποίοι πάντα έχει ο καθένας προτεραιότητα σε σχέση με τους άλλους, για το δικό του λόγο. Τι να κάνω; Στη Διεύθυνση της Δευτεροβάθμιας Εκπαίδευσης τους έλεγα να πηγαίνω εκεί να κάνω ό,τι χρειάζεται από τους υπολογιστές τους. Στο Ερευνητικό τμήμα στην Αθήνα που μου είχανε ζητήσει να τους φτιάξω κάποια πράγματα να προσπαθώ να εξηγήσω, πως δεν είναι ότι βαριέμαι ή κάτι τέτοιο, αλλά ρε παιδιά, το laptop μου τα έπεξε! Και για όλους τους υπόλοιπους να τραβήξω τον αντίστοιχο Γολγοθά, μιας και όταν λες κάτι τέτοιο όλοι θεωρούν ότι τους δουλεύεις και πως είναι μια δικαιολογία για να την κάνεις λούφα... Παρότι σε κανέναν, ποτέ δεν έχω δώσει τέτοιο δικαίωμα, ή τουλάχιστον έτσι νομίζω!

Το laptop ήταν ακόμα σε εγγύηση, αλλά η εταιρία (η καινούργια) δεν το ήξερε. Άντε να βρίσκω το ρημάδι το βιβλιαράκι και να στέλνω Fax την αντίστοιχη σελίδα που το έλεγε. Καθυστέρηση μέχρι να απαντήσουν από εκεί. Τελικά το μηχάνημα πήγε στο service, το οποίο δεν ήταν πλέον στη CPI, αλλά σε κάποια άλλη εταιρία, που απ' ότι κατάλαβα έχει όλο το service της ACER, αλλά δεν είμαι σίγουρος γι αυτό. Και το αποτέλεσμα; Το laptop ΕΙΝΑΙ ΑΚΟΜΑ ΕΚΕΙ! Ναι, δε μου έχει επιστραφεί ακόμα και μετά από δυόμιση μήνες που είναι στα χέρια τους. Τόσο καιρό περιμένανε μητρική από το εξωτερικό, η οποία δεν είναι σε stock ούτε στη μαμά εταιρία (λογικά την ACER). Πριν λίγες ημέρες ήταν που μου είπαν πως τελικά ήρθε μητρική πλακέτα και την έχουν αλλάξει, αλλά περιμένουν τώρα το ανεμιστηράκι του επεξεργαστή! Τι να πω και πάλι ο άνθρωπας! Δε μπορούσαν να κρατήσουν το ρημάδι το ανεμιστηράκι από την προηγούμενη μητρική; Τόσος κόπος ήταν να λύσουν μερικές βίδες και να ξεκουμπώσουν το βύσμα από το ανεμιστηράκι το προηγούμενο; Καταλαβαίνω πως θέλουν τα πάντα να είναι στην εντέλεια και να είναι όλα καινούργια για να αποφύγουν όσο το δυνατόν περισσότερο το να πάθει άλλη ζημιά το μηχάνημα, αλλά ρε παιδιά ΕΛΕΟΣ!!! Το έχετε το ρημάδι εκεί τόσο καιρό! Και να σχεδίαζα τη μητρική πλακέτα από την αρχή, να την τύπωνα, να τοποθετούσα και να κολλούσα τα εξαρτήματα, λιγότερο καιρό θα μου έπαιρνε!

Αν ξαναγοράσω κάτι από ACER, να μου το κόψετε από τη ρίζα (το χέρι, έτσι;...)

Αυτό βέβαια που θα έπρεπε να αναφέρω, είναι πως τα παιδιά στο μαγαζί Terrabyte στα Χανιά, από το οποίο αγόρασα το laptop και είναι και αυτοί που κάνουν όλη την επικοινωνία με το service είναι άψογοι. Μακάρι όλα τα μαγαζιά να φερόντουσαν έτσι στον πελάτη!